When it comes to lifting weights, I’m not your girl. But this guy, David Dellanave, totally is. David is a top notch lifter, and owner of The Movement Minneapolis in the Twin Cities. He’s also an extraordinary coach and has trained numerous international level athletes.
David has come up with a FANTASTIC exercise routine that combines resistance band training and weightlifting. We've decided to share it with you! You can access his full blog and webpage here!
Bands are like shots of flavoring in your coffee. They should be used with extreme prejudice, but when the time is right they’re exactly what you want.
I’ve got 4 ways to use bands in your deadlifting, judiciously of course. Two of them you may have seen before, but I’ll bet you haven’t seen the other two.
1) Banded Deadlift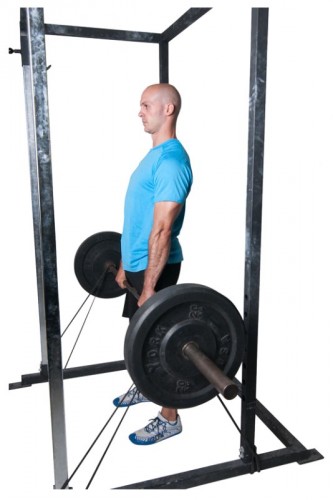
This is the most common form of using a band in a deadlift. It provides an accommodating resistance that gets progressively harder as you get closer to lockout due to the stretch in the band. As an aside, I’ve never liked the term accommodating resistance for something that sure as shit doesn’t accommodate and definitely makes it harder, but I digress.
The idea behind the standard band deadlift is that because the deadlift gets easier as you get closer to lockout but weight stays constant it may be useful to make the top range of the movement more difficult. In practice I have found this to be useful when used sparingly.
My preference is to use a setup where the majority of the weight is on the bar, but you get 100 to 150 pounds of additional resistance at the top of the lockout. My band of choice is usually a thin purple Iron Woody band (like I’m giving away to one lucky purchaser of Off The Floor) on each side of the bar. I’ve measured this out and it works out to be about 100lbs depending on the specific dimensions of your setup.
A word of caution. Be extra careful on the eccentric or lowering portion. The band is going to actively pull you down in a way that gravity alone does not, and if it catches you by surprise you may be on your way to snap city.
2) Reverse Band Deadlift
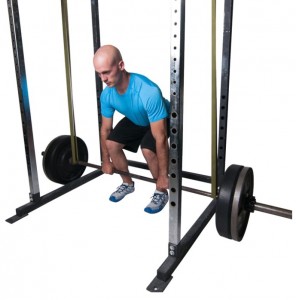
The reverse band deadlift, perhaps not at all surprisingly, is intended to have the opposite effect of the banded deadlift. Instead of making the lockout harder, you’re getting some help in the initial portion of the pull and as you release tension from the band the weight gets heavier and gets closer to the true weight on the bar. In other words, it makes the start of the pull easier but the lockout is the same. This could allow you more total repetitions at a difficult starting weight than if you had to complete the full rep. Another advantage may be that it teaches you to have a specific load in your hands, but you’re moving it more quickly thanks to the band assistance.
For the reverse band deadlift you’ll need much heavier bands if you’re hanging them from a typical power rack. The thick green Iron Woody bands are a good starting point. In this variation you need a pretty good amount of resistance to make a significant impact on a heavily loaded barbell.
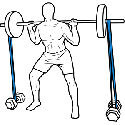
3) Front Banded Deadlift
This variation can be incredibly hard and a fantastic teaching tool. One of the biggest and most common mistakes people make with their deadlift is letting the bar drift forward away from the body. Any separation between the bar and the shins is increasing the leverage significantly. As you can probably imagine, using bands to actually forcefully put tension on that vector is going to make things pretty exciting. If you have trouble getting your lats engaged then this variation is a winner.
This works best with very light band tension – the same thin purple Iron Woody bands as in the band deadlift and you’ll want to only pull a few inches of tension into the band by backing the bar away from the rack or anchor point. I like to loop the bands around the bar first, and then use rack pins if available.
4) Solo Band Deadlift
I don’t know what else to call this so as not to confuse it with doing a barbell deadlift with bands. I want to be very clear, this is not a go-to strength builder. You’re not going to get to a triple-bodyweight pull by jumping up band sizes doing this movement. But here’s an example of when it’s really useful:
We had been in Ecuador for 4 days. After an 18 hour travel day of multiple flights, many hours in the car, and several hikes my back was really bothering me. It wasn’t injured, just the kind of annoying tension and ache that I often feel when I haven’t done some resisted hip and spinal extension (aka deadlifts) in a while. Since there was no hope of finding a barbell and plates, I was glad I had packed a couple bands. A couple sets of 15-20 later and I felt good as new.
The solo band deadlift is a travel lifesaver. Bands take up very little space and are versatile exercise tools besides the use for deadlifts. Here’s how I set it up: